
The Camera
I recently came across a really good deal on a WiFi Video Doorbell being cleared out by AusPost for AU$29 a pop (specifically, the Q-See QDB03-AU). The unit comes packaged with a pair of 18650 Lithium-ion batteries that are claimed to provide up to 6 months standby and has a list of features that include 2-way talk, PIR motion sensing and local SD card recording (card not included). While I had no doubts that this thing would default to bouncing all of my video feeds (among other things) through a manufacturer’s “cloud”, I couldn’t resist ordering one as a personal research project. If I’m lucky, there will be an RTSP stream available to send to my own NVR and the cam will never need to see the internet.
After the camera arrived, the first step was to get it connected to a wireless network. The instructions specify that this is to be achieved via an app (“QHSmart”) on an Android or iOS device. I was never intending to follow the instructions, so the real first step was actually to whip out a screwdriver and take a peek inside. The main chip is a Hi3518 IP Cam SoC with an Hi1131 WiFi module. No shocking discoveries at this stage meant that I could move on to powering it up.
The Protocol
Assuming that this device would use a similar initial setup mechanism to other WiFi devices that I have (light bulbs and sockets), I fired up tuya-convert on a laptop with Kali Linux… and while that tool was not able to configure the device network settings directly, it did provide me with an isolated wireless network on which to continue my research.
Some WiFi devices let you provide your network details by starting themselves up in WiFi Access Point mode. You connect to the device network and then, via browser or app, input your network credentials (hopefully encrypted), then the device joins your main network. Some other devices provide a “simpler” method where you stay connected to your main network, enter the WiFi password into their app and wait for the new device to join. This method “works around” the security of WiFi by encoding the details into packets in a way that lets the new device “sniff” them out of the air even without being able to decrypt the packet data.
The QHSmart app didn’t play nicely with my iPhone 11 (or perhaps modern iOS), so I downloaded it to an older iPad Mini then attached that to the test network to capture packets while using the app to set up the camera. Instead of a barrage of packets with varying lengths (per tuya-convert), what I saw was a barrage of packets with the same length but to different destinations. Nothing appeared noteworthy about the timing of the packets (think infrared signal pulses), leaving only the MAC addresses that would be visible to a client without the network password. I ran the config a couple of times with mock passwords and compared the output sequence of MAC addresses captured.
$ tshark -r camera-0.pcap -nn -e eth.dst -Tfields > dest_macs_0.txt
$ tshark -r camera-1.pcap -nn -e eth.dst -Tfields > dest_macs_1.txt
At this point I was able to learn that:
- All of the MAC addresses had OUI
01:00:5e(IPv4 Multicast) - The config sequence appears to be 48 packets, repeated over and over again
- The packets are each sent twice in a row (so only 24 distinct packets)
- The 4th byte appeared to identify “sections” of the config
- The data is contained only in the last 2 bytes of each MAC
After clearing out the duplicate rows:
$ diff -y dest_macs_0.txt dest_macs_1.txt
01:00:5e:00:48:92      01:00:5e:00:48:92
01:00:5e:01:2b:53      01:00:5e:01:2b:53
01:00:5e:02:5f:fc      01:00:5e:02:5f:fc
01:00:5e:20:0a:0a      01:00:5e:20:0a:0a
01:00:5e:40:61:60    | 01:00:5e:40:60:61
01:00:5e:41:63:62    | 01:00:5e:41:62:63
01:00:5e:42:65:64    | 01:00:5e:42:64:65
01:00:5e:43:67:66    | 01:00:5e:43:66:67
01:00:5e:44:69:68    | 01:00:5e:44:68:69
01:00:5e:60:f0:07    | 01:00:5e:60:72:c0
01:00:5e:61:59:cd    | 01:00:5e:61:ea:f7
01:00:5e:10:0c:0c      01:00:5e:10:0c:0c
01:00:5e:30:74:76      01:00:5e:30:74:76
01:00:5e:31:75:72      01:00:5e:31:75:72
01:00:5e:32:74:73      01:00:5e:32:74:73
01:00:5e:33:66:2d      01:00:5e:33:66:2d
01:00:5e:34:61:6c      01:00:5e:34:61:6c
01:00:5e:35:68:73      01:00:5e:35:68:73
01:00:5e:50:cc:88      01:00:5e:50:cc:88
01:00:5e:51:5e:f7      01:00:5e:51:5e:f7
01:00:5e:70:23:23      01:00:5e:70:23:23
The diff showed me that changing the password only modified 7 MAC addresses in the sequence, with everything else remaining the same - this essentially confirmed the idea that 4th byte identifies sections, as 2 sections had changed (to be identified later as the password and the checksum sections). Continuing on, I captured the traffic sequences with different password lengths and values (1234567890, aaaa, AAAA, zzzz, ZZZZ, plus many more) along with some changes to the SSID value. The SSID was not obfuscated at all, the MAC address bytes translated directly to ASCII values. The password section, at least for the first character, showed a clear correlation between the the ASCII value of each input character and the resulting MAC address byte, but unfortunately the subsequent character bytes appeared to also be shifted by some additional value, so I needed to keep digging.
With an initial focus on changing just the first character of the password, something odd was happening each 16th ASCII character. Each time the lower 4 bits rolled over from 1111 (0xf) to 0000 (0x0), the higher 4 bits would decrement by one instead of increment (e.g. 0x4e -> 0x4f -> 0x30 -> 0x31). There was also no value where the higher 4 bits produced a 0x5, a clue!
Introducing my obfuscating friend XOR
You would never broadcast the WiFi password in plain text for the world to see, right? That would be dumb. What’s that? Encoding or obfuscating it doesn’t actually make it any more secure? Oops, well… that’s awkward.
The first character of the password is encoded by calculating the XOR (exclusive OR) of the characters ASCII value (in hex) and 0x50, like this for “a” which is ASCII 0x61:
01100001 (0x61)
01010000 (0x50)
========
00110001 (XOR Result = 0x31)
This is consistent with the packets captured when “a” was the first letter of the password.
In fact, all of the characters are simply encoded via an XOR against 0x50+i, where i is the index of the character in the password, which for the first character is just 0. The reverse of an XOR is the same XOR, so decoding the password is a matter of taking the byte values from the MAC address, XORing them against 0x50+i to get the original ASCII value.
Checksum Time
The 2 packets after the password were most likely to be some kind of checksum. With a lucky first guess, I put the encoded password bytes into this checksum calculator and confirmed that the 4 bytes are a basic CRC-32. The same method is used to calculate a checksum of the SSID section.
Putting It All Together
The following diagram shows a breakdown of the sections in the config sequence and the values that can be decoded using the methods described above:
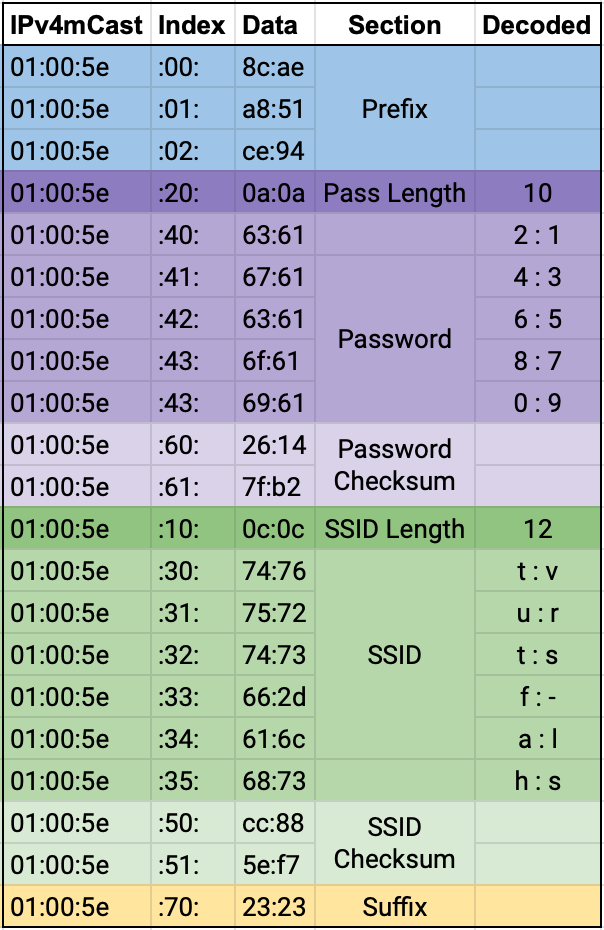
Note that the prefix data bytes, while they do change between launches of the mobile app, don’t seem to hold any meaning (that I could find), and the suffix address is always static.
So Now What?
After the camera WiFi was successfully configured and it joined the (still isolated) network, its DNS queries quickly identified it as a Xiongmai device. With a growing list of XM devices on the market, this configuration method can likely be recycled for many of them, so I put together a little tool xmquickconfig that can generate the required packet sequence from an SSID/Password pair.
Now that the camera is attached to my test network, the next step is to try to interface with it, the details of which will likely make it into a future post.
comments powered by Disqus